Thursday, June 28, 2012

MG Kampfer WIP 1: Turtle Power!


Introducing my next project: MG Kampfer "Desolator"

This is will be the 1st WIP post for this build. The Kampfer is one of my favorite mobile suit designs, and I was lucky enough to purchase this 30th anniversary release for a bargain. It includes extra clear armors, which opens up a lot of room for modding. The rounded armor sections remind me of a turtle - so I decided to build a concept around that. I have no green gunpla yet, so I wanted this one to be green. What kind of turtle is green and awesome? A teenage mutant ninja one of course! If you were born yesterday, "Teenage Mutant Ninja Turtles" was a popular action cartoon back in the early 90s. The protagonists were four turtles that found their way into a puddle of glowing green ooze called
"mutagen" that was seeping out of a canister. It turned them into humanoid turtles with the ability to think and speak and crave pizza. They meet Splinter - a kung-fu sewer rat - who teaches them the way of the ninja...and rest is history. Combining these ideas, I came up with this:


The line art is just a rough draft of what I have in my head, so I won't follow it to the letter..err..line.

Phase 1 was to snapbuild the kit - sanding and drilling along the way, adding detail where I felt it was lacking, and of course, wiring the radioactive canisters into the model.

Here's my progress so far:


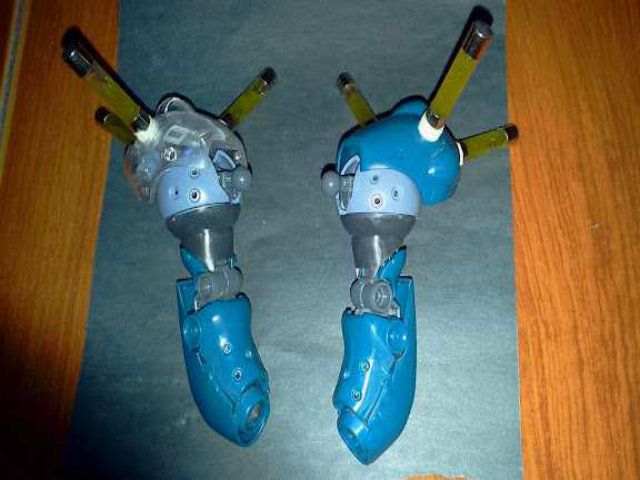
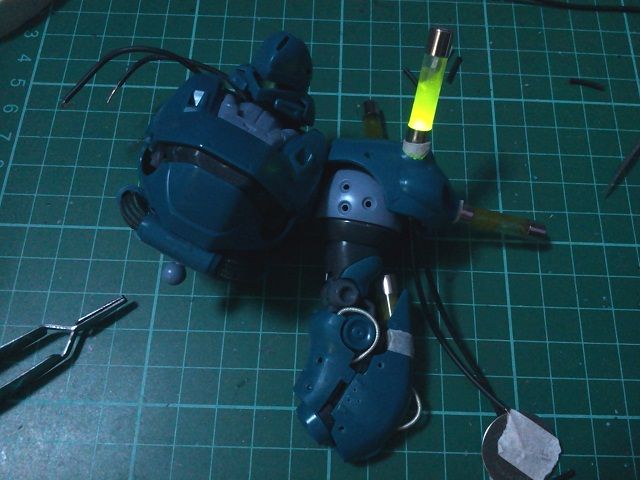
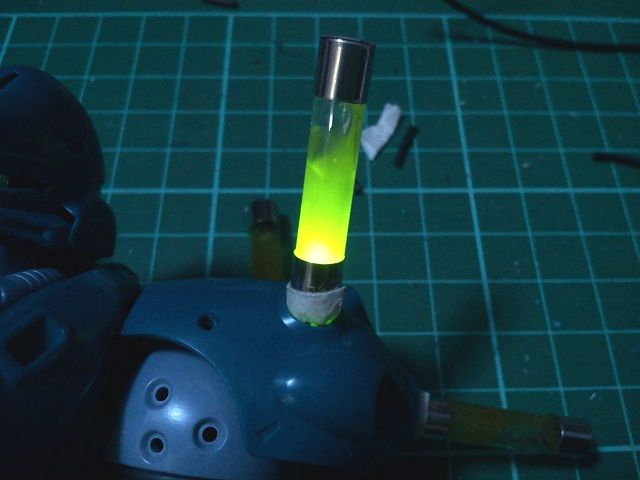
built the arms sans the hands, which I tend to do last coz they break easily. I've managed to bore out the places where the spikes are supposed to go. I used the clear shoulder on the other arm so they both had slots for canisters. I've made the shoulder canisters by carefully drilling into the bottoms of glass fuses, injected it with some hair gel tinted with Tamiya clear green, then placed a yellow led to seal the hole. I test fitted the canisters using masking tape and they work ok. I just did a bit of puttying to smooth out the canister slots.

I built the head and torso, did some detailing on the arms and drilled more holes for rivets, and added a mono eye LED:


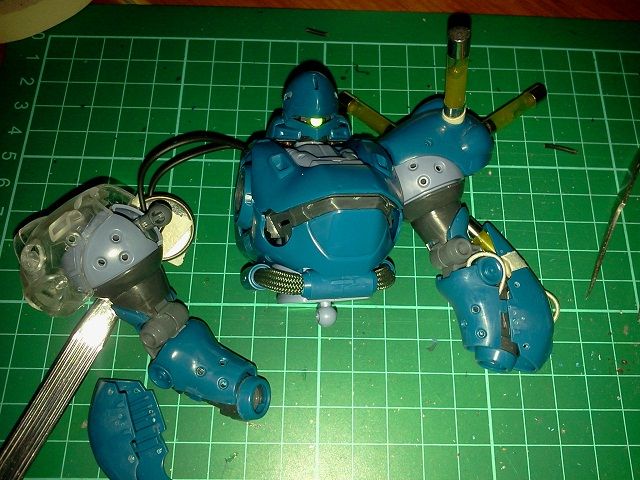
arm detailing: rivet holes, wire effects, elbow canisters


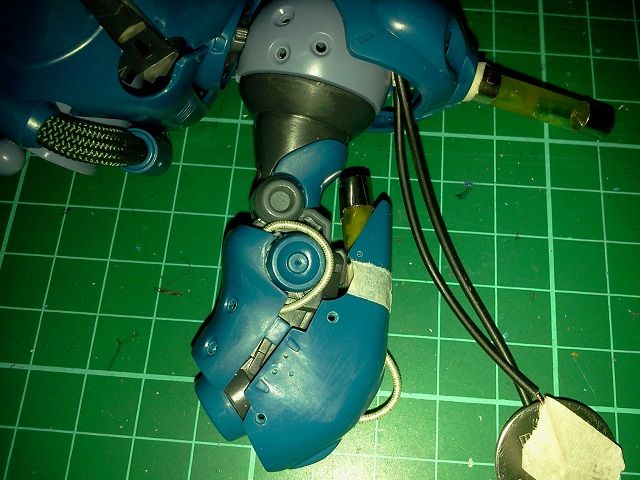
...not sure if I can still add LEDs to the elbow canisters as there isn't a lot of room left for their own battery (which bring up weight issues) or if i can figure out a way to wire it into the torso, which is rather hollow. I might just have an external power source in the end, as this thing is going to have a LOT of LEDs..
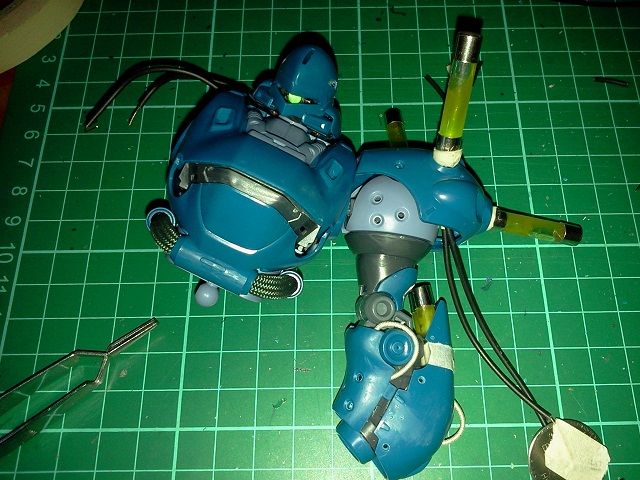


canister led test:


I intend to use a bosny chrome or gold base, then apply tamiya clear green mixed with tamiya clear yellow, so the finish will be something like my Sinanju. It will be hand painted, so I expect it to be a bit uneven, but if I play it right I might be able to use the blotchy effect to my advantage and achieve some form of shading/shadowing.

This is going to be one hell of a project, as it will be my first serious attempt at a clean model (ie. no nubmarks, fixed seamlines, smooth paint), not to mention the amount of modification I need to do to make everything work - wiring through the arms and legs without messing up the articulation, building the custom backpack, weapons and so on - and in order to keep myself motivated to maintain quality I have entered this model into Gundam Eclipse's Summer War competition!

Find out more about it here:

http://gundam-eclipse.net/topic/4805363/1/
and you can follow my WIP thread here:
http://gundam-eclipse.net/topic/4842586/1/#new

(not sure if you need a forum account to view those...)

I will still update the WIP here on the blog, but expect faster updates on the Summer War thread.

Wish me luck!

Thursday, June 21, 2012

ToyCon 2012

a very well done Warmachine cosplay
Last weekend, ToyCon 2012 was held at SM MegaMall, and I was able to check it out with my wife, my fellow otaku brother-in-law and his wife. 

The event was fairly large - mega trade halls 1, 2 and 3 were packed with booths, toy displays, gaming areas, a full stage, and a toy museum for different collector groups. There were so many people we had to squeeze ourselves through a sea of cosplayers looking for toy deals. Surprisingly, I found no good gunpla deals at all! Everything I picked up was overpriced. I guess the idea was to haggle for better prices - but getting a 50% discount on something priced twice as much as normal is just stupid.

 I guess the retailers had to make a profit, or get back the fees they paid to join the event or something. Perhaps die hard collectors looking for that elusive action figure to complete their set would have had a blast at the event, but honestly the prices really killed it for me. Even the bootlegs were overpriced. (How did bootlegs get into the event anyway?) I did enjoy the toy displays - the 1/6, 1/4 and life size sculptures took the cake. 


these are busts...not cosplayers.


You can see a few more pics of the event here: 
ToyCon2012

My greatest disappointment was not making it in time to submit my mecha contest entry... I was going to enter the mecha contest with my Delta Plus which I had detailed up..but we arrived late due to heavy traffic, and I had to lug around my backpack containing my entry for the rest of the day. I could still enter the Delta Plus at the next event anyway so no big deal. Here are some pics of it that I took the night before.


Stay tuned for my next project: MG Kampfer!

Thursday, June 7, 2012

Hi Nu VEVO WIP 4: COMPLETE!

This is the last part of my Hi Nu VEVO build. In my last post I achieved 99% completion, missing only the main back thrusters and some minor details. I have finished them, and this model is now 100% complete. (at least until I think of something to do with the mediocre rifle)

For such an impressive backpack design this model only has two big thruster bells jutting out of the back. They look unexciting next to the fin funnel system and giant propellant tanks, so I decided to modify them. For some reason this kit had some extra side skirts, so I used those as fins, and then attached two metal thrusters to complete the effect. Here’s what I ended up with:


I think they go really well with the design and give this powerful MS the propulsion system it deserves!

The modified thruster systems are attached using the same ball joint, so they can still be moved around without obstructing the fin funnels. I also added some spare hydraulics (also from the kit, it has a lot of spare parts) to the funnel system dock. - they’re those red cylinders near where the funnel system attaches to the back.


I'm glad I took my time with this build, the end result speaks for itself and I really learned a lot of tricks along the way. My advice to anyone building this model is to be careful when snapping the parts together...the plastic is thin..the thinnest i've worked with in fact, as it seems the manufacturer decided to sacrifice durability in trying to achieve better detail. The only fitting problems i had were the tiny vents that kept falling out of the shoulders..nothing some glue couldn't fix. I 'd recommend this kit to anyone who want's a highly detailed model that looks good even straight out of the box. I haven’t purchased a new kit yet, but I’ll be keeping myself busy drilling and adding rivets to my previous builds.

Till next time!


Tuesday, June 5, 2012

Hi Nu VEVO WIP 3: 99%

This is part three of my Hi Nu VEVO build.

I was able to bring the build up to 99%. I only have a few minor detailing jobs and I have not attached the main back thrusters hoping that I can make them look more mechanical to go along with the rest of the kit.

For the fin funnel system and stabilizer: Lots of rivets, IC pins used here, and I used a portion of a paperclip to represent a pipe running down the midsection of the stabilizer. I also did some minor weathering where i saw fit.


Shield:  More rivets, reversed IC pins to resemble mini antennae, and I added blue “horns” to make the shield look bigger. I got lazy here and didn’t measure where to drill, so I ended up with uneven rivets..oh well..still looks nice I think.


Rifle: Nothing much going on here…I think this guy deserves a much better weapon than this…like gundam wing’s buster rifle. I will mod this for sure…


Here he is at 99%:


I'll put this guy up on the shelf once the back thrusters are done, here are more pics for now... 
Hi Nu VEVO

Till next time!