
Hello plamo nerds! Here's an update on my current project, the Boros. I finally got around to painting the damn thing after nearly a month of grueling clean up and paint prep. I may have spent more time getting this kit ready for paint than I've spent actually painting previous projects. For a while it felt like an endless cycle of puttying, sanding, priming, sanding, puttying, sanding, priming - but with the recent conclusion of the Back to Basics series, I've gained a new appreciation of the process. I now find mini-bursts of satisfaction just looking at a primed part and feeling how smooth the surface is, and I must confess I've wasted precious build time doing just that.

Click on the Read More link for the rest of this post...
Some links to the previous WIP posts for this build in case you missed them...
WIP 4
I broke the kit down into sub-assemblies and primed with mr. surfacer 1200. This first layer revealed a few more defects such as gaps in previously fixed seams, scratches and a couple of rough patches.

The faulty parts had to go through the fixing and sanding process again. The shoulder armor and gun were particularly uncooperative and had to go through several cleanup cycles to eliminate all the errors.


After testing out some color schemes in GIMP, and a heated argument with myself, I was convinced that everything was ready and pulled the trigger on the first layer of paint.

I decided to go with mostly red with white trim similar to the Yen Xing Machine Messiah from Five Star Stories. A base of mr. color gloss white was applied on everything except internal frame. The paint prep paid off as I was rewarded with a smooth finish on almost every part.


Once the base white was properly cured I went into masking mode. As tape likes to peel off over time, this had to be done in batches to ensure the edges remained sealed when the parts received the next layer of paint. I learned this the hard way in an older project, masking all the parts over a week, only to find that the first ones didn't have a good seal anymore and ended up with paint seeping through.


The masked parts were treated to a layer of mr. color gloss red, which looked absolutely sexy as it cured to a nice glossy finish. I masked off the remaining parts while waiting for the 1st batch of red to cure. Unmasking was a treat, revealing crisp clean lines. I got lucky this time, with only 1 part requiring a redo.


I actually goofed up here. I was so excited to see how my masking turned out that I forgot I was supposed to do a highlight of orange on the reds before unmasking. I had to switch to a finer tip on my airbrush and do some really controlled shooting to avoid mucking up the white trim. Here are some before and after pics...


While it seems like I'm nearing the finish line, I'm actually not sure how soon I can complete it. The reason my plamo time was severely limited for the past year or so was because I've been overseeing another major WIP: my very own house!


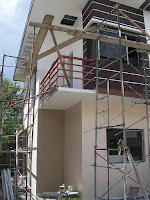


I never realized how stressful (not to mention expensive) building a house would be. From getting the plans and documents ready, to securing the funds, to getting the contractors to do their damn jobs properly, you could say this project has been a walk in the park...if the park was Lakeside Amusement Park in Silent Hill. Anyhow, it all pays off in the end. It's a 5 minute drive (or 10 minute bike ride) from home to work, my son will grow up breathing fresh mountain air, and as a bonus, I get to have my very own work space!


..Okay so it's more of a work cabinet and not an actual plamo room, but compared to the plastic bin I've been building and painting out of for years? I'll take it!
I promise to do a full feature on the cabinet once it's done and stocked up with my gear. Stay tuned for the conclusion of the Boros build. Until next time, keep building plamo!
I broke the kit down into sub-assemblies and primed with mr. surfacer 1200. This first layer revealed a few more defects such as gaps in previously fixed seams, scratches and a couple of rough patches.
The faulty parts had to go through the fixing and sanding process again. The shoulder armor and gun were particularly uncooperative and had to go through several cleanup cycles to eliminate all the errors.


After testing out some color schemes in GIMP, and a heated argument with myself, I was convinced that everything was ready and pulled the trigger on the first layer of paint.
I decided to go with mostly red with white trim similar to the Yen Xing Machine Messiah from Five Star Stories. A base of mr. color gloss white was applied on everything except internal frame. The paint prep paid off as I was rewarded with a smooth finish on almost every part.


Once the base white was properly cured I went into masking mode. As tape likes to peel off over time, this had to be done in batches to ensure the edges remained sealed when the parts received the next layer of paint. I learned this the hard way in an older project, masking all the parts over a week, only to find that the first ones didn't have a good seal anymore and ended up with paint seeping through.


The masked parts were treated to a layer of mr. color gloss red, which looked absolutely sexy as it cured to a nice glossy finish. I masked off the remaining parts while waiting for the 1st batch of red to cure. Unmasking was a treat, revealing crisp clean lines. I got lucky this time, with only 1 part requiring a redo.


Luckily mr. color lacquers seem to be quite forgiving to over-thinning, and I was able to keep overspray in check by shooting close range. The subtle orange highlight gives it some life and makes the color combo less christmasy, I think...


Once all the reds are done I can work on the internal frame, panel lining, decals and maybe some minor weathering so this mech looks used but decently maintained.
While it seems like I'm nearing the finish line, I'm actually not sure how soon I can complete it. The reason my plamo time was severely limited for the past year or so was because I've been overseeing another major WIP: my very own house!


I never realized how stressful (not to mention expensive) building a house would be. From getting the plans and documents ready, to securing the funds, to getting the contractors to do their damn jobs properly, you could say this project has been a walk in the park...if the park was Lakeside Amusement Park in Silent Hill. Anyhow, it all pays off in the end. It's a 5 minute drive (or 10 minute bike ride) from home to work, my son will grow up breathing fresh mountain air, and as a bonus, I get to have my very own work space!


..Okay so it's more of a work cabinet and not an actual plamo room, but compared to the plastic bin I've been building and painting out of for years? I'll take it!
 |
| my trusty portable spraybooth...we've been through a lot... |
Been following your blog for a while and I seriously love it. I've learned so much from your tuts. Thanks!!
ReplyDeleteas the late Robin Williams said in Bicentennial Man, "one is glad to be of service." :)
DeleteA tutorial to make a digital lineart for your build would be great :) Keep up the good work!
ReplyDeleteSounds good! I'll document the process and will have this up on the blog in the near future. Thanks for the idea!
Delete