
Greetings and salutations plamo nerds! You'll have to forgive my absence from the blog since August, but I had to pour all my time and focus on my GBWC entry. With so many tasks in my to-do list up until the last few days, I was worried I'd bitten off more than I could chew and would not finish in time - but I barely made it, completing the project in the wee hours of the morning on the last day of submission! Now that the Philippine leg of GBWC2018 has concluded, I can finally share with you my WIP photos, build process, and lessons learned from the event. Let's get started!

Warning: pic heavy, give it time to load :)
Click on the read more link for the rest of this post...
Bored and alone in my hotel room in Silicon Valley, I began snapping together the 1/100 Gusion kit some time in March of this year. I didn't have a concept then, but I was determined to build around the Gusion for two reasons: #1 I really liked the design but thought it would benefit immensely from re-proportioning, and #2 I picked it up at Toys R' Us (PH) - so it would be suitable as a base kit for a GBWC entry (it's a rule). Anyway after building the kit's main parts I began experimenting with the legs to see how I could stretch it out.


For the diorama I wanted to capture the Suzumebachi's behavior of savagely ripping apart their prey and delivering their harvest of body parts back home to feed the colony. It just fascinates me how nature is capable of such vibrantly colorful creatures - and make those creatures so savage they can massacre tens of thousands of bees for the benefit of their own hive without remorse.
Warning: pic heavy, give it time to load :)
Click on the read more link for the rest of this post...
Concept
Bored and alone in my hotel room in Silicon Valley, I began snapping together the 1/100 Gusion kit some time in March of this year. I didn't have a concept then, but I was determined to build around the Gusion for two reasons: #1 I really liked the design but thought it would benefit immensely from re-proportioning, and #2 I picked it up at Toys R' Us (PH) - so it would be suitable as a base kit for a GBWC entry (it's a rule). Anyway after building the kit's main parts I began experimenting with the legs to see how I could stretch it out.


It took some plastic surgery to get the Rebake's lower leg frame to fit into the Gusion's (flipped upside down) , but this was the very first mod of the project, and the one that would make me commit to this build for the rest of the year. I simply loved the way the legs looked, and I knew I could take it in so many different directions. Alas, the right direction eluded me for the next month, and the parts went back into the box for the remainder of my assignment in San Jose, and stayed there until I flew back home to the PH.


After making up some lost time with my family, I took the kit out of the box again when an idea came to mind. The flattened burger-shaped head of the Gusion looked a lot like a bug's - and the whole thing I thought, resembled an insect if the torso and the arms were also stretched out. Doing a bit more research on fierce bugs, I finally settled on what my gunpla's spirit animal would be: The Asian Giant Hornet - Japan's infamous Suzumebachi (スズメバチ)


 |
| Asian Giant Hornet images from google (imgur/wired) ctto |
The Suzumebachi is one of the meanest bugs on Earth. Like the honeybees that they slightly resemble , these hornets live in a hive tending to a queen and her offspring - but that is the extent of their similarities. Suzumebachi hornets do not make honey. They are carnivorous and highly aggressive bugs that grow to about 3 inches from head to stinger, with an even wider wingspan. Suzumebachi hornets actually prey on bees, and just a squadron of these winged demons can decimate an entire colony of bees in a matter of hours. With thick armor impenetrable to bee stingers, they chop up their victims with large mandibles, and then carry home the most nutritious parts to feed their larvae. The Suzumebachi's striking yellow-orange color serves as a warning to anyone who gets too close, but if you are flagged as a threat, you get sprayed with pheromones that will incite the rest of the hive to swarm and chase you for miles. They sting repeatedly, and inject so much venom the attack can cause kidney failure. The Suzumebachi is one of the deadliest animals in Japan - and perhaps the world - responsible for 30 to 40 deaths per year. Here's a link to an aptly named youtube documentary on these beautiful but ferocious creatures: Hornets from Hell


With my newfound inspiration I went to work, transforming the Gusion into a mecha version of the fearsome Suzumebachi.
Build
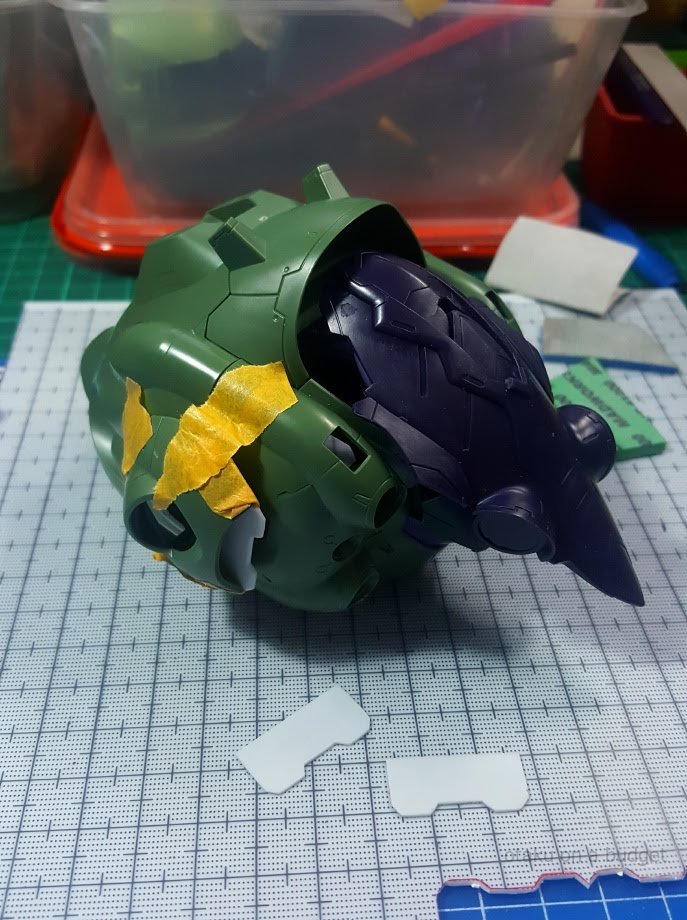
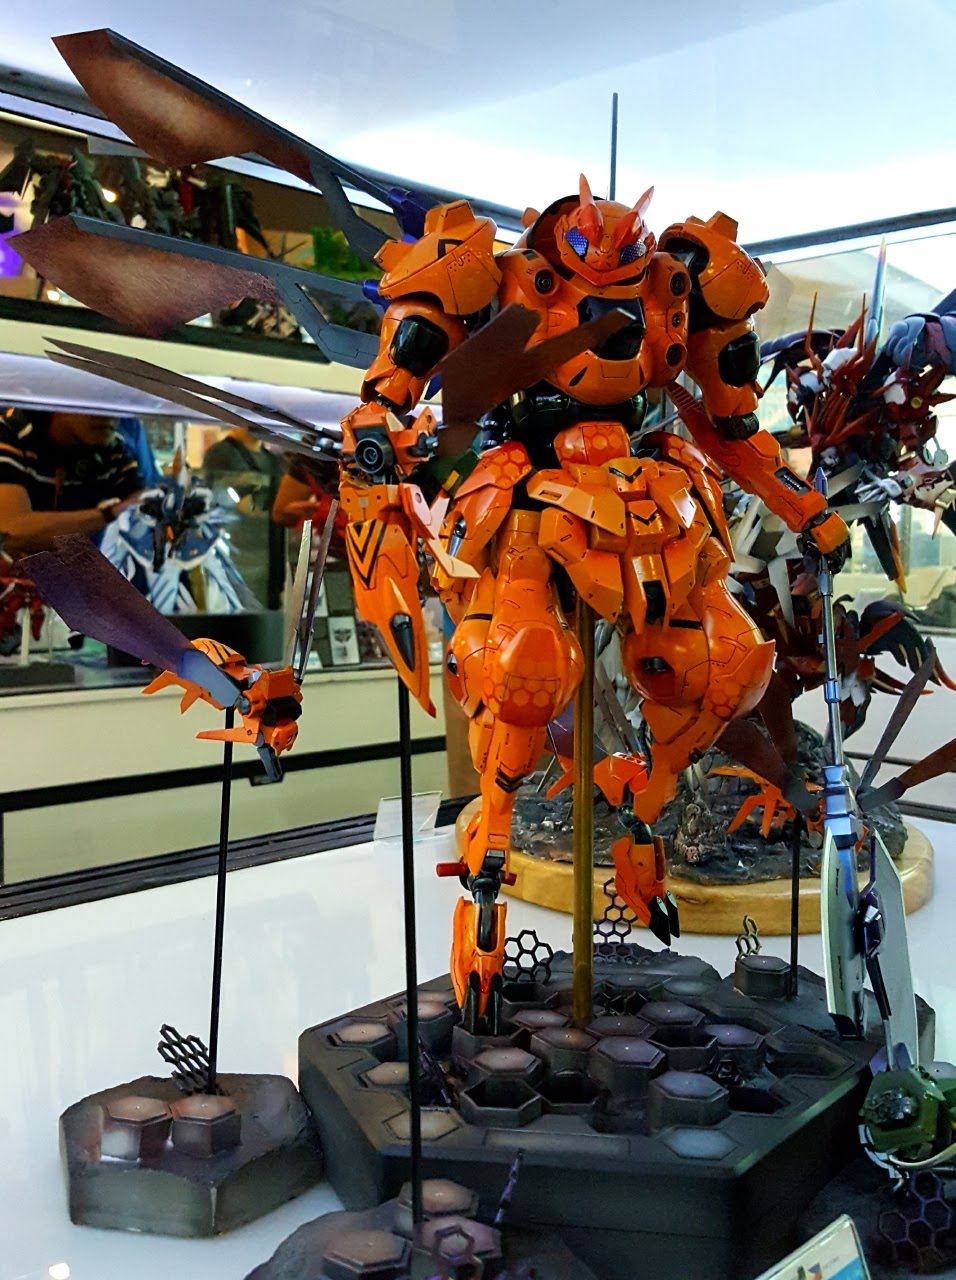
There were two major elements that I would have to create: a large, bulbous abdomen, and two pairs of wings. After foraging through my parts bins, I found these bits from a Zaku exceed head that were an interesting round shape and tried to fit them on, and also mocked up some wings with cardboard. The Gusion has these four vents on the back armor that would make perfect attachment points for articulated wings.


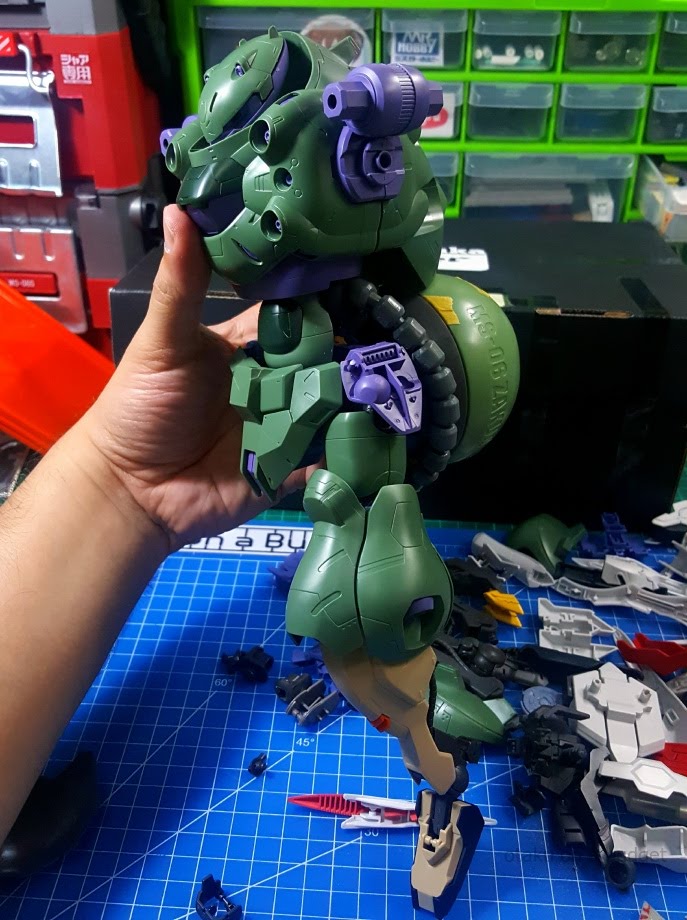
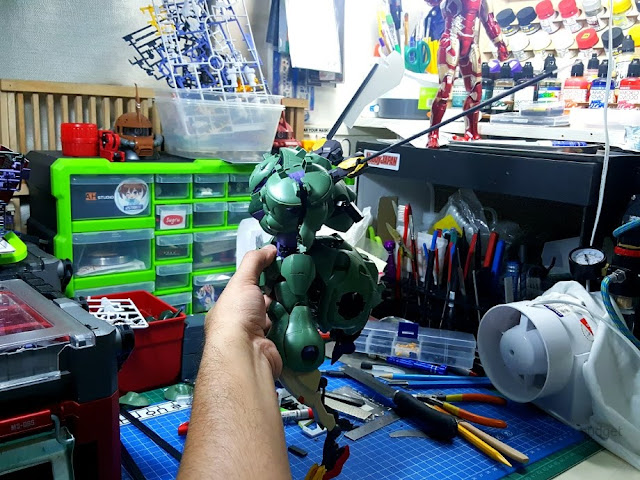
These elements gave me the first silhouette of what I wanted to create, but after staring at it in this state for hours I imagined it looked more like a fly than a hornet. The abdomen was too spherical, and a certain fast food chain mascot comes to mind. It was back to the drawing board after that, and I had to hunt for more parts to suit my needs. That, or I would need to scratch build more than I was expecting to. I parked the idea and went to work on the proportion mods, trying out different configurations for the arms and settling on a slim profile using Gusion parts spliced with Lupus Rex forearms. The torso frame was also extended by stacking two internal chest frames on top of each other and using steel epoxy to bind the parts together permanently. By keeping the joints unobstructed I was able to keep the original articulation.


After scavenging for more parts, I found the abdomen I was looking for in the form of a second Gusion body. To mount this part to the main frame I used the Gusion's original rear skirt and trimmed the armor down so it would fit inside the abdomen, which is mostly hollow since I didn't put the frame in there. The side voids meant for arms were patched over with Gusion vernier bits and some styrene.


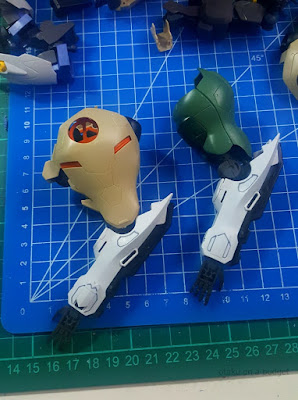
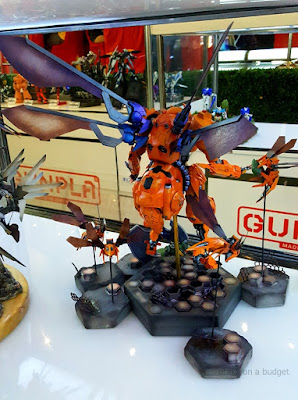
The stinger section was made using parts of a Hashmal drone to complete the basic shape. This modification would then give birth to another bold idea: Why not create drone hornets, so the main unit could represent the queen? I knew pursuing this would severely impact my build schedule, but it was just one of those ideas that you couldn't shake, and made so much sense that not pursuing it would only keep me awake at night.


Thankfully I had the perfect kit for the job. The HG Kimaris Vidar had these side skirts that made great looking abdomens. Bashed with it's own foot frame I was able to get some nice articulation in there too, so the drones could bend and aim their nasty stingers the way an actual hornet does. Hand armor bits from the Lupus made for some cute little hornet heads. I then found that the Kimaris' lower leg armor would make nice attachment points for the wings, so I bought another kit to get two more legs, and therefore make two more drones - for a total of four. At that point I felt like I had taken on more work than I could manage, and the pressure was on.


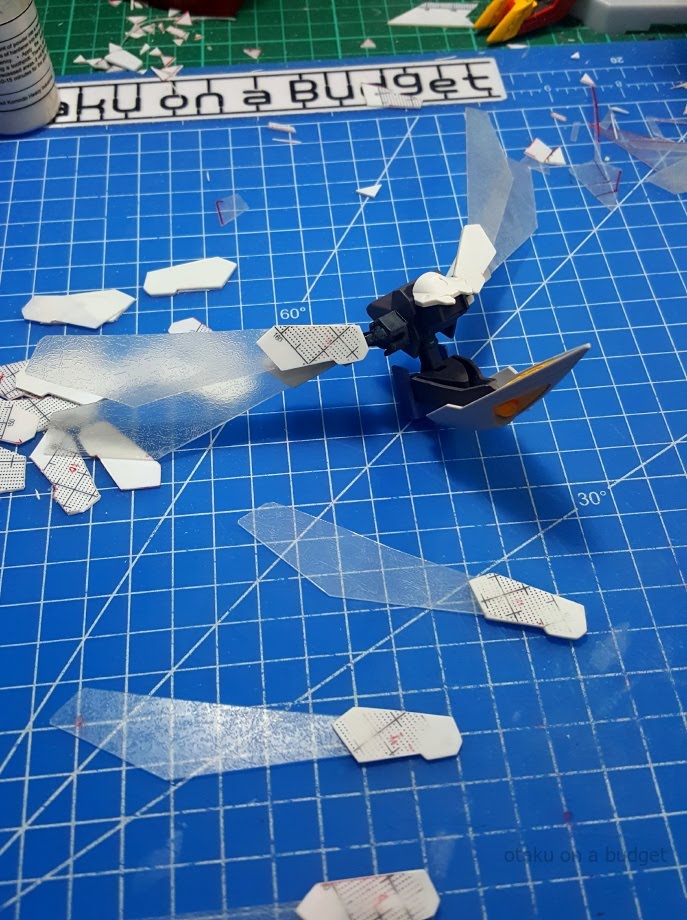
With the abdomen figured out, I turned my attention to the queen's wings. I did some rough sketches for the general shape and structure. There was nothing in my spare parts bin to make the kind of wings I needed, so I had to build them from scratch. The wing frames were built from 3mm and 1.5mm thick styrene, which I detailed up with some scribing. I trimmed a lot of plastic from the inside of the Kimaris Vidar leg armors so the wing frames could slide into it. Armored Komodo SD putty was used to take care of the seams and gaps throughout the kit.


To achieve good articulation, I used some ball joints to mount the wings to the main body. For the wing blades themselves I wanted something thin and transparent to resemble insect wings, and found a textured plastic folder that was great for the application. I wanted to go as big as possible with the wings, so I did a lot of measuring to make sure I could keep the total wing span within the competition's 50cm limit. The final wingspan maxed out at around 48 cm, tip to tip. I also swapped the Rebake feet out for some Lupus Rex claw feet, that I would later modify in a similar fashion to my Kitsune feet, which improves range of movement and allows it to "tiptoe".


To achieve good articulation, I used some ball joints to mount the wings to the main body. For the wing blades themselves I wanted something thin and transparent to resemble insect wings, and found a textured plastic folder that was great for the application. I wanted to go as big as possible with the wings, so I did a lot of measuring to make sure I could keep the total wing span within the competition's 50cm limit. The final wingspan maxed out at around 48 cm, tip to tip. I also swapped the Rebake feet out for some Lupus Rex claw feet, that I would later modify in a similar fashion to my Kitsune feet, which improves range of movement and allows it to "tiptoe".


With the wings settled I went back to working on the drones. I made the drone wings using the same approach, scratch building with styrene sandwiching a transparent wing blade and then cementing them to ball joints. I positioned the wings at different angles to make them more dynamic, but they can be posed for flight and folded back over the body when they "land". I used some articulated frame parts to make "guns" on the thoraxes of three of the drones, but exempted the fourth drone for a special role that I'll explain later. I came up with some dagger-like styrene legs for the drones, a task made easier thanks to my handy styrene cutter.


Fully committed to the hornet theme now, I went to work on the head, adding mandibles, antennae, large bug-like eyes that I could mask off later for an interesting effect, and some armor bits to complete the look. I played around a lot with different antennae/horn shapes, but settled on some Hashmal parts for a cleaner, less fragile appearance.

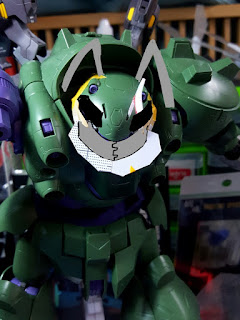


The hands that came with the kit were much too small for the now re-proportioned main unit, so I dug up my 1/100 builders parts hands, and modded some claws onto them for good measure. Hashmal claws and Rebake armor bits were also added to the elbow section, and some verniers were added to the heels. I thought the hips could be a little wider, so I grafted Kimars Vidar rear skirts to her stock side skirts, trimming some plastic underneath and adjusting the attachment point to preserve articulation. The fronts skirts were also doubled up and detailed with some vent parts, for a heavily armored look. I did some scribing and plating here and there to add detail throughout the model. Once all the modification work was completed, I went back over all the parts that needed seam-fixing, thankfully just a few in this build: the shoulder armors, the fore arms, and the kimaris vidar leg armors. I went over the kit several times, looking for nub marks and scratches, puttying and smoothing them out as I went. It's a time consuming step, but a necessary one in my book.


The hands that came with the kit were much too small for the now re-proportioned main unit, so I dug up my 1/100 builders parts hands, and modded some claws onto them for good measure. Hashmal claws and Rebake armor bits were also added to the elbow section, and some verniers were added to the heels. I thought the hips could be a little wider, so I grafted Kimars Vidar rear skirts to her stock side skirts, trimming some plastic underneath and adjusting the attachment point to preserve articulation. The fronts skirts were also doubled up and detailed with some vent parts, for a heavily armored look. I did some scribing and plating here and there to add detail throughout the model. Once all the modification work was completed, I went back over all the parts that needed seam-fixing, thankfully just a few in this build: the shoulder armors, the fore arms, and the kimaris vidar leg armors. I went over the kit several times, looking for nub marks and scratches, puttying and smoothing them out as I went. It's a time consuming step, but a necessary one in my book.


I didn't have a proper weapon for the queen yet, but after seeing Avengers:Infinity War recently I knew I wanted an axe. There were some suggestions for a massive drill or a lance, and I can't say I wasn't tempted - but after all the Digimon references thrown at my Kitsune build last year, I wanted to keep the normies from saying Suzumebachi looked like a certain Pokemon. For the weapon, I used the Rebake's poleaxe for a base and scratched up an even larger blade for it using styrene. I then added some armor bits here and there to beef it up, and applied a lot of scribing for detail. An axe seemed like a good representation of how the Suzumebachi decapitated and chopped up their prey.


Paint
With my inspiration it didn't take long to decide the color scheme for this build. I was going for a vibrant yellow/orange scheme with contrasting black and gunmetal sections, with maybe some color shifting tones to add flair. I masked off the drone wings and laid down a thin layer of Armored Komodo primer over the models. This initial priming revealed more surface defects that had to be fixed and resanded. The scratch built parts needed the most rework as expected, but I was able to smooth it all out before laying down the final primer layer using both Mr. Surfacer and Armored Komodo primers.


I used mostly Armored Komodo paints for this build. The frame parts were based in Charcoal black, followed up with some Gunmetal. I then base coated most of the body in Salamander orange, and then did some highlighting and shading using Cyber yellow, Fluorescent orange, and Gaia gloss red. I applied a lot of masking on this kit, making some stripes on the abdomens and also a hex pattern on some of the main unit's armor parts. Some of the parts were done in black to further break up the orange and emphasize the hornet look. I masked around vents and redid them the same way I painted the frame.


The weapon was also based in black and then gunmetal, and then I masked around the blade edge to paint it silver. I then laid down thin layers of Armored Komodo Heliconia which gave it a nice color shift effect. The same technique was applied to the wing frames, while the wing blades themselves received some Arkom clear brown followed by more Heliconia. The queen's eyes were done in gloss black, masked with a fine hexagon mesh, and then painted with Heliconia as well, completing the color shifting bug eye look.


All the parts were treated to some Armored Komodo mirror gloss, before applying the traditional black panel liner. I printed some custom decals for this model, but decided not to apply them. "It's modeled after an insect - so why would it have any decals?" is the question I asked myself. I imagined this mecha to be autonomous like the Hashmal, capable of spawning drones and maintaining itself - so warning decals seemed pointless. In the end I settled with just some discreet unit numbers on the drones, more to help me identify who's who than anything else. A final layer of gloss was applied, leaving it to cure as I worked on the diorama. I went with gloss because I didn't think it was as common in the GBWC, and it might help my already bright orange model stand out from the crowd of matte and heavily weathered entries.


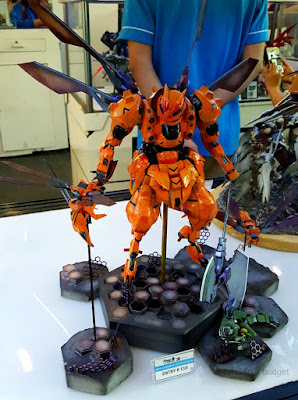
Diorama
For the diorama I wanted to capture the Suzumebachi's behavior of savagely ripping apart their prey and delivering their harvest of body parts back home to feed the colony. It just fascinates me how nature is capable of such vibrantly colorful creatures - and make those creatures so savage they can massacre tens of thousands of bees for the benefit of their own hive without remorse.
 |
| (suzumebachi image from imgur, ctto) |
 |
| I suck at drawing... |
First I needed some materials to build a hive-like base. With just a couple of weeks before the deadline, it seemed like a daunting task to scratch-build something big enough to accommodate all the elements of my piece - but as luck would have it, I didn't need to. My son had this game where a penguin stood in the middle of a base assembled from hexagonal blocks that represented ice. Each player would tap an ice block away, one at a time, until the whole thing collapsed and the penguin fell through. We had been playing it when I realized the board was perfect for my diorama. They were dirt cheap too, so I ordered a couple sets online with no trouble. I stacked two of those together and filled it with grey tile grout. I then pushed some hex blocks and bits of chopped up hex grille into the wet grout to create my hive layout. A brass rod was added to serve as the stand for the queen in flight. This was allowed to cure for a few days, before I was finally able to do some test mounting. I didn't get to take photos of those steps, but here's what it looked like before it got painted.


There was no room for the drones on the main base however, so I also ordered a hexagonal cement mold that I would use to make modular bases for the queen's loyal subjects. I used more tile grout to make the bases, embedding thin metal rods from a broken umbrella to serve as drone mounts. By having everything modular, I could change the positioning of the drones and do lots of fun poses with them later on - and since everything is a hexagon, they all "dock" together in random looking hex patterns. I had my son help me out in creating the bases - an activity which he thoroughly enjoyed.


To complete my scene, I needed a victim - a role filled by all too many Graze units - and this build was no exception. I had an old 1/100 Graze, actually the first ever IBO kit I bought from TRU, and it would serve as the perfect sacrifice. I assembled the upper half of the main kit, adding some mechanical damage with bent guitar string and random mechanical bits to the torso connection, the neck area, and the socket where the right arm would have been. I painted the Graze parts in OOTB colors, applying a bit of weathering and damage effects like scratches, burns and oil leak stains.
I kept that one drone without a cannon because it would obstruct the decapitated Graze head it was meant to carry. The base was primed and then painted in Armored Komodo Nato black, and then the hexagon blocks were glazed with some Gaia bright aluminum for a metallic effect. I applied some Arkom clear red for a bit of color on the hex blocks, while the hex mesh details were done in Heliconia. I think I was able to achieve the alien, random hexagon patterned landscape one might find in a giant mecha hornet's hive - if such a thing ever existed.


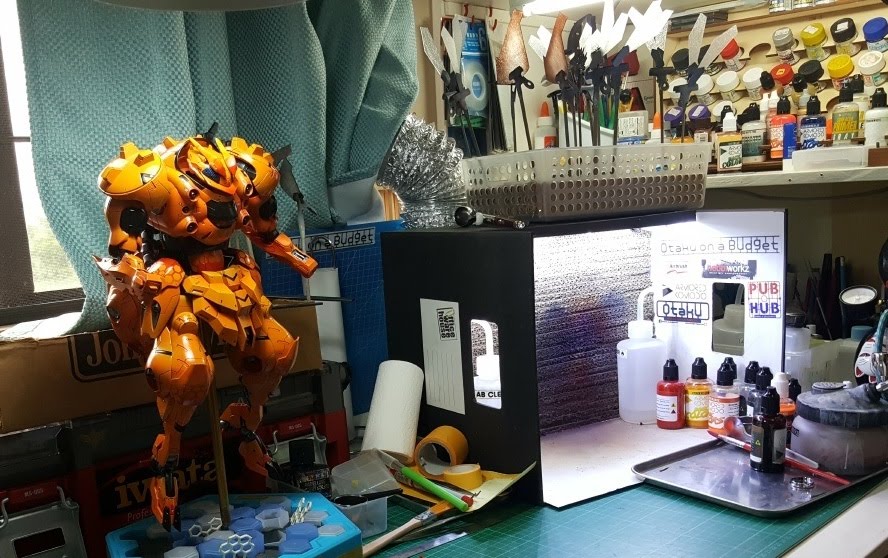
With everything assembled I was finally able to appreciate my own handiwork. I loved the color shifting effect on the wings, the axe, and the eyes, and I think it contrasted well with the vivid orange of the armor. The last couple of tasks on my to-do list were crossed out at around 4AM of the last day of submission. I was completely exhausted at that point, but adrenaline and excitement kept me working through the home stretch. I got in a few hours of some much needed sleep, before packing my entry up and making my way to the event venue.

Special thanks to Armored Komodo, Hobbiworkz and Harder & Steenbeck - this build would not have gone as smoothly if it weren't for their reliable gear and top quality hobby supplies!


I kept that one drone without a cannon because it would obstruct the decapitated Graze head it was meant to carry. The base was primed and then painted in Armored Komodo Nato black, and then the hexagon blocks were glazed with some Gaia bright aluminum for a metallic effect. I applied some Arkom clear red for a bit of color on the hex blocks, while the hex mesh details were done in Heliconia. I think I was able to achieve the alien, random hexagon patterned landscape one might find in a giant mecha hornet's hive - if such a thing ever existed.


With everything assembled I was finally able to appreciate my own handiwork. I loved the color shifting effect on the wings, the axe, and the eyes, and I think it contrasted well with the vivid orange of the armor. The last couple of tasks on my to-do list were crossed out at around 4AM of the last day of submission. I was completely exhausted at that point, but adrenaline and excitement kept me working through the home stretch. I got in a few hours of some much needed sleep, before packing my entry up and making my way to the event venue.
GBWC 2018
The display cases were almost full when I arrived, and I was a little worried I wouldn't have a decent spot to present my work, but the helpful event staff found me a nice section of shelf real estate. I signed up and wrote down "Hornet's Harvest" as the title of my diorama, before pulling on some gloves and carefully reassembling each element while my wife and son took pictures. As I posed my kit, more than anything I felt relief. It had been a stressful and sleepless couple of weeks up until that point, and I must thank my family for their patience and understanding of my passion for this craft. After taking a sufficient number of photos of my own kit on display, I was ushered out of the competition area to give way to other last-minute contestants. I would have liked to get a good look at my rivals' awesome builds, but it would have to wait until the next weekend.


Judgement day came, and after making some quick adjustments to the way my entry was posed I was able to witness how the judges carefully inspected each piece. With the same stacked shelves layout and insufficient lighting as last year however, they seemed to have a difficult time appraising the models - straining their necks to view the cramped kits from different angles, and on more than a few occasions they had to break out a flashlight to get a better look.


You'd think that after years of the same thing happening, the organizers would take a hint - but it's a free event, so we can't complain. Anyway it was pretty intense watching Kawaguchi sensei scrutinize my work, and it was interesting to watch the judges go around the display area, score sheets in hand, trying to maintain a poker face the whole time so the audience wouldn't decipher their picks. I got to chat with some of the local scene's finest, and took what would turn out to be prophetic selfies.


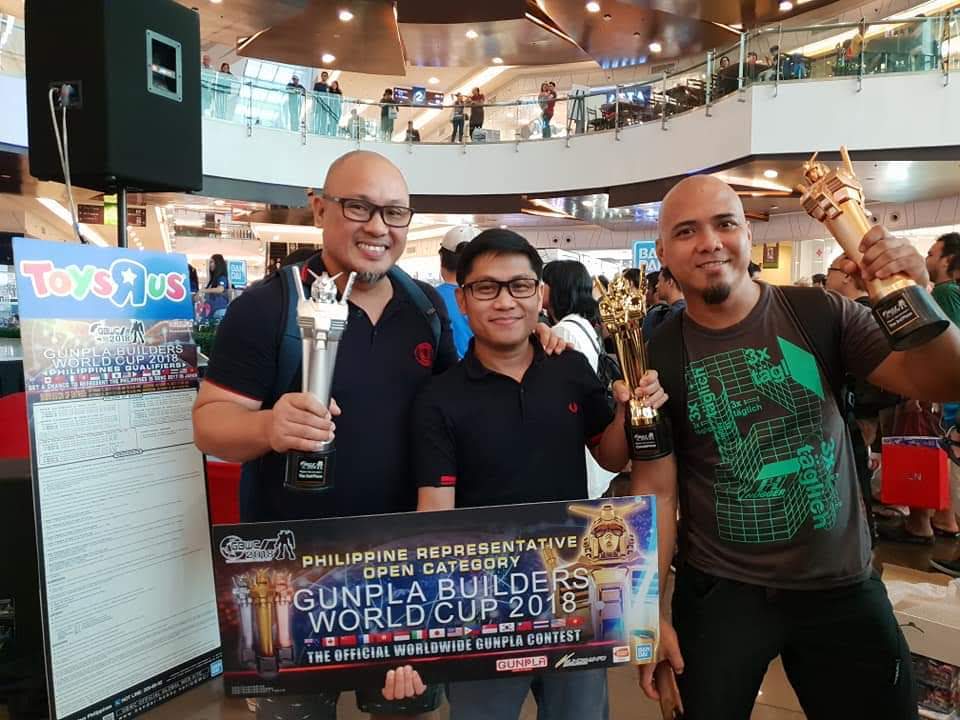
The winners were announced the next day. James Quinsaat's super clean and detailed Gyanko diorama would bag 1st place in the senior open category, followed by Alex Arevalo's custom Barbatos over a bed of intricately painted skulls. Third place went to last year's world champ, Mark Mediavillo, who fielded another monster in his signature mechanical kitbash style.

Hornet's Harvest came in humble fourth place - at least I'd like to think it was 4th, being the last one called before the 2nd runner up was announced - but then again there might be no such thing.
I must admit I was a little bummed I couldn't hand a trophy to my wife and son, who endured my absence for so many nights just to let me complete my entry...but with the level of competition I was up against this year, I shouldn't even be disappointed. I tip my v-fin to all the winners, and congratulate them for having what it takes to be champions.
When last year's GBWC was concluded I promised to outdo myself, and in that regard I believe I was successful. In retrospect, the biggest challenge I had to overcome this year was my desire to keep good articulation, despite the competition requiring nothing more than a static model. I put so much thought and effort into range of movement - because as I understand it, gunpla models aren't meant to be statues - but I probably should have spent all that time on detailing and a more eye catching diorama instead. To prepare for next year, I need to come to terms with this personal paradox. I must decide whether to build according to my taste, or build according to what the competition demands. How does that saying go again?
I'll be back again next year alright...
Guns blazing.


Judgement day came, and after making some quick adjustments to the way my entry was posed I was able to witness how the judges carefully inspected each piece. With the same stacked shelves layout and insufficient lighting as last year however, they seemed to have a difficult time appraising the models - straining their necks to view the cramped kits from different angles, and on more than a few occasions they had to break out a flashlight to get a better look.


You'd think that after years of the same thing happening, the organizers would take a hint - but it's a free event, so we can't complain. Anyway it was pretty intense watching Kawaguchi sensei scrutinize my work, and it was interesting to watch the judges go around the display area, score sheets in hand, trying to maintain a poker face the whole time so the audience wouldn't decipher their picks. I got to chat with some of the local scene's finest, and took what would turn out to be prophetic selfies.


The winners were announced the next day. James Quinsaat's super clean and detailed Gyanko diorama would bag 1st place in the senior open category, followed by Alex Arevalo's custom Barbatos over a bed of intricately painted skulls. Third place went to last year's world champ, Mark Mediavillo, who fielded another monster in his signature mechanical kitbash style.

 |
| (*photos grabbed from Gundam Philippines page and James Quinsaat) |
Visit the Gundam Philippines facebook page for more info on the winners: Gundam Philippines
Conclusion
I must admit I was a little bummed I couldn't hand a trophy to my wife and son, who endured my absence for so many nights just to let me complete my entry...but with the level of competition I was up against this year, I shouldn't even be disappointed. I tip my v-fin to all the winners, and congratulate them for having what it takes to be champions.
When last year's GBWC was concluded I promised to outdo myself, and in that regard I believe I was successful. In retrospect, the biggest challenge I had to overcome this year was my desire to keep good articulation, despite the competition requiring nothing more than a static model. I put so much thought and effort into range of movement - because as I understand it, gunpla models aren't meant to be statues - but I probably should have spent all that time on detailing and a more eye catching diorama instead. To prepare for next year, I need to come to terms with this personal paradox. I must decide whether to build according to my taste, or build according to what the competition demands. How does that saying go again?
"You don't bring a knife to a gunfight." ...or something like that.
I'll be back again next year alright...
Guns blazing.

Special thanks to Armored Komodo, Hobbiworkz and Harder & Steenbeck - this build would not have gone as smoothly if it weren't for their reliable gear and top quality hobby supplies!

You can look forward to a proper photo shoot of Suzumebachi and her drones in the coming weeks. Thanks for sticking around! Until next time, keep building plamo!
No comments:
Post a Comment