Tuesday, June 5, 2012

Hi Nu VEVO WIP 3: 99%

This is part three of my Hi Nu VEVO build.

I was able to bring the build up to 99%. I only have a few minor detailing jobs and I have not attached the main back thrusters hoping that I can make them look more mechanical to go along with the rest of the kit.

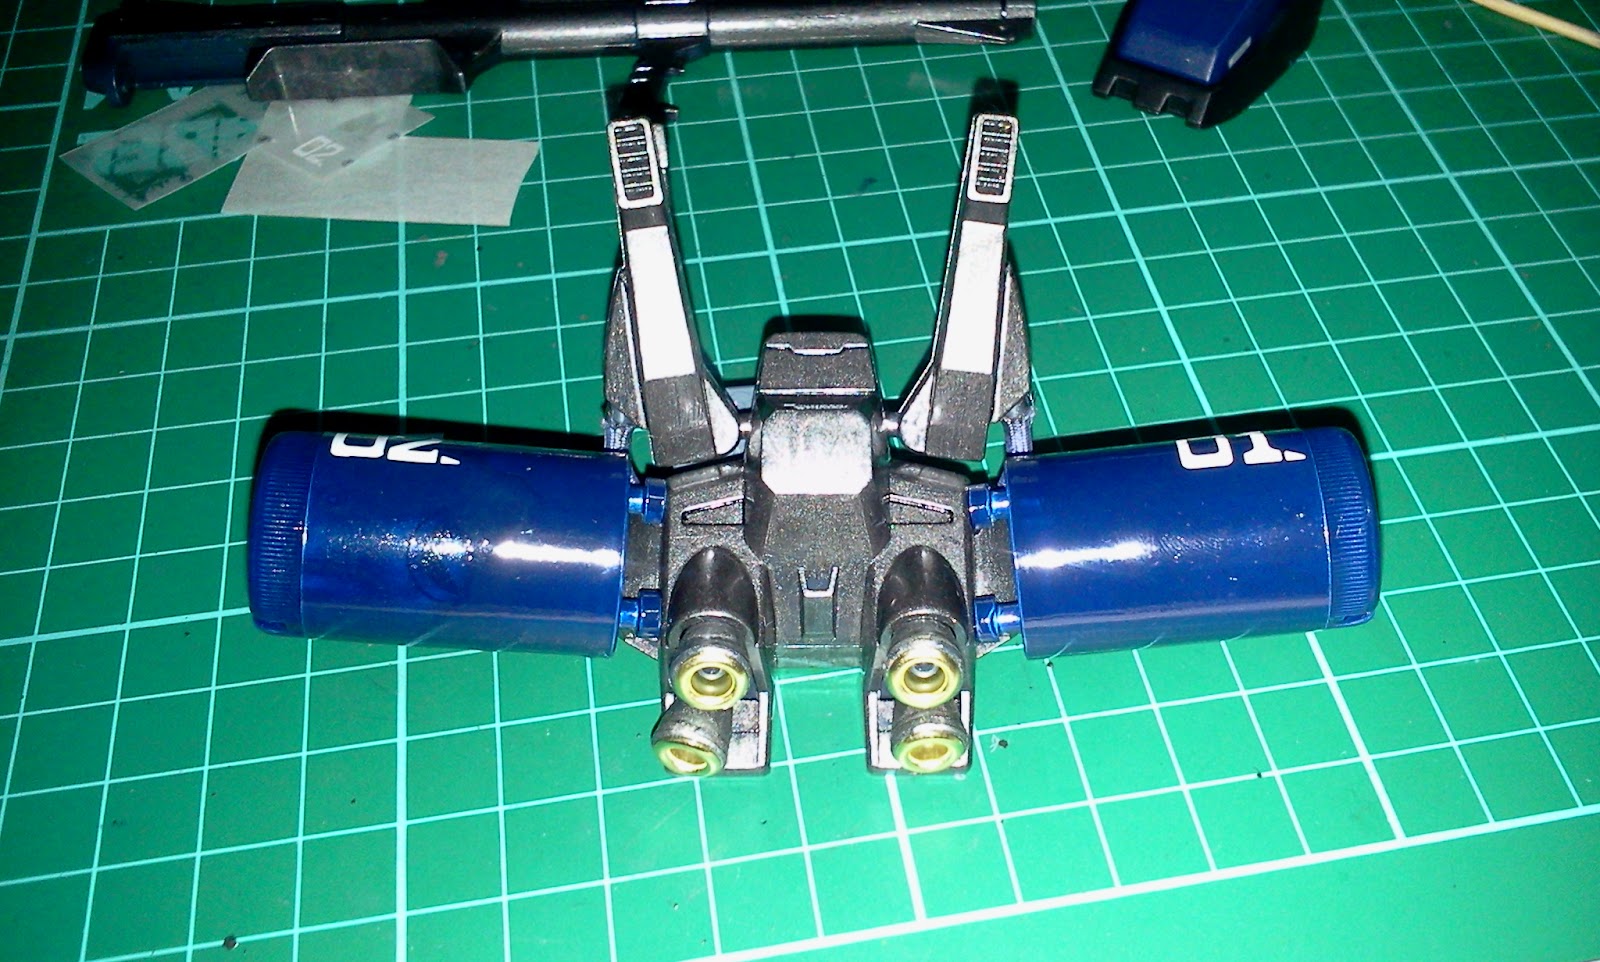
For the fin funnel system and stabilizer: Lots of rivets, IC pins used here, and I used a portion of a paperclip to represent a pipe running down the midsection of the stabilizer. I also did some minor weathering where i saw fit.


Shield:  More rivets, reversed IC pins to resemble mini antennae, and I added blue “horns” to make the shield look bigger. I got lazy here and didn’t measure where to drill, so I ended up with uneven rivets..oh well..still looks nice I think.


Rifle: Nothing much going on here…I think this guy deserves a much better weapon than this…like gundam wing’s buster rifle. I will mod this for sure…


Here he is at 99%:


I'll put this guy up on the shelf once the back thrusters are done, here are more pics for now... 
Hi Nu VEVO

Till next time! 


Monday, May 28, 2012

Gundam Model Kit Contest 2012


Greetings gundam fans! The Gundam Model Kit Contest was held last week at SM North EDSA and I was able to go and see the work of my fellow modellers and snap some pics. The event was restricted to 1/144 scale kits from the Gundam Age, Seed Remastered and Universal Century series, but there were also some larger kits on display. Other attractions included a free straight-build side event, and a kit sale where everything was overpriced except for the waterslide decals (100php per sheet). Enough talk, let’s have some pics!

(* sorry for the bad quality, these were taken with my phone)


More in this album:
I didn't stick around to see who won because we had other plans for the day, but seeing all the great work other modellers were able to put out has got me fired up to improve my skills and take this hobby to the next level. I’ll keep an eye out for upcoming events and hopefully I’ll be able to participate. Now, if only I can convince my wife that I need an airbrush…

Hi Nu VEvo WIP 2


This is part two of my Hi Nu VEVO build (look up part one in the post entitled “So much to do, so little time..”). Three weeks into this project, I have now built the main mecha: head, body, arms and legs. Being a plastic recast of a resin kit, there is a lot of room for detailing on this model. I was able to acquire a pin vise (finally) and some decal sheets at a recent event, and I put them to good use in this project. I also added some shading with tamiya weathering master. Here are some pics:
(WARNING: PIC HEAVY)
Leg detailing:

Rivets, Head Vulcan:

Extra vents on shoulders:


Hydraulics:


…that’s what I have so far. I think I’ll be taking a little more time on this kit to add even more rivets/thrusters/hydraulics and to clean up visible nub marks. Till next time!

Wednesday, May 23, 2012

So little time, so much to do...

So I finally got to see the first four episodes of Gundam Unicorn (the English dubbed version, thanks to my bro-in-law) and may I just say that it is top notch. It has a movie-like feel to it, as if the whole series was an OVA special. It was great to see my favourite mobile suits in action – the female-piloted Kshatriya  laying waste to dozens of mobile suits, and then going head to head with the Unicorn - and of course the Sinanju manned by none other than the 2nd Char Aznable. His battle with Banagher in episode 2 was nothing short of epic. After seeing the series  the master grade Unicorn has made it to the top of my wish list… I already have a color scheme in mind – and to be able to pose my Sinanju kicking the Unicorn in the gut would be priceless. There will be a special screening of episode 5 at SM North EDSA on May 27, 10am-1pm for the participants of the Gunpla competition on the 26th. Other otakus may also see the movie by purchasing 300php worth of Gundam merchandise at participating stores. If time permits I will go there to see the contest entries, but I will probably just watch episode 5 at home.

See the mechanics below:


 In other news, I was finally able to get double bazookas for the Sinanju! The runners looked like they had more flash than actual parts but a good deal of trimming and sanding did the trick. I painted these with the ever dependable mr. hobby steel and then decal'ed them up with wet transfer Zaku bazooka insignia and a few Sinanju dry transfers i had left over. Threw in a bit of detailing in gold and black panel lines and here's what i ended up with:
monster guns go well with the monster backpack...

 This guy is done….......for now ;)

 I hit a roadblock in the Hi Nu VEVO WIP when I realized I was missing an entire runner (the A runner no less!) . Instead I had two D runners, which is why we got the right count when we checked the box. Luckily I was able to make a side trip to get the runner replaced. Lesson learned: when purchasing a kit, check the runners one by one – a little diligence can mean the difference between a great kit and one with a missing leg.


The white runners look good sprayed in Bosny pearl white and panel lined with grey gundam marker, the blue runners have been hand painted mr. hobby metallic blue, while the internals are hand painted in mr. hobby steel. I never liked yellow-on-white parts of gundams...somehow they reminded me of sunny-side-up eggs.. so i re-did those parts in mr hobby flat red. Here's what I have so far: the upper body is done sans decals - the kit came with a big sheet of water-slides and I intend to put them to good use..

Stay tuned for more updates on this build – hopefully I’ll have it on the shelf by end of May!


Thursday, May 10, 2012

Trigger Happy


Next in line for the remodeling project was the MK2 in Titans colors. Out of the box this kit already looked customized because of the alternate paint scheme. Unfortunately the previous owner snap-built this kit as if he had to do so in the shortest amount of time – leaving nubs everywhere. If this model was ever going to make it to my shelf I had no choice but to take it apart, sand down the nubs, and paint it. This mobile suit looks very bulky – sharing the leg and arm girth of taller models such as my Delta Plus – so I decided to do a heavy weapons theme. The kit would still have that dark blue base color, but I would load it up with lots of firepower.
Like in all of my gunpla projects, I started with painting and detailing the internal frame, and then I sprayed the outer armor dark blue...


These machineguns intended for Halo action figures (see the hands attached?) had great detail and were the perfect size – I just had to buy them. At 80 php each they were a steal (Divisoria FTW!)


I added these ammunition barrels to the backpack so this MK2 would never run out of ammo in a fight like that chump Trowa Barton always does. What are they made of? Look up at your fluorescent light…see that cylindrical thing under the magical glowing tube? It’s called a starter. It's not expensive.


For the ammo belts, I broke out the snake chain (Divisoria FTW!). I had to glue two strands together (one link at a time to retain flexibility) to form a belt.


...I added missile pods to the shoulders and legs for good measure. (i got these from an electronics store...not sure what they're called but i call them missile pods.)  Fresh off of the cutting mat: MK2 Heavy Weapons System – a trigger-happy MS pilot’s wet dream!


...so let's go!

reminds me of the APUs from the Matrix..

if bullets don't do the trick, holster the machine gun...

...and shoulder the bazooka!

head to the Shelf section for more pics!


Tuesday, May 8, 2012

Grandpa Gundam


 Anyone can snap-build a kit, but it takes a lot more patience and creativity to produce something truly unique. In whatever I got into, I always found that adding my personal touch to my chosen fandom always brought me greater satisfaction – I built my own tarantula hides (even sold a few), designed Magic decks from scratch, customized my Android tablet to oblivion, and so on. I recently acquired these master grade kits in a trade… 
(left to right: Crossbone ver. Ka, Zeta Gundam, RX78, MK2 Titans Colors)

Me being me, I couldn’t possibly display these built kits on my gundam shelf without first modifying them. Starting with a prebuilt kit has its pros and cons – it is easier to get an idea of what you want your kit to look like when you can see it as a snap-built model rather than pieces stuck to runners, but then there is the added task of taking the kit apart again and prepping it for painting…all the while praying to the plamo gods you don’t break anything. 

I started my remodelling project with my favourite among the four - the RX78. Being the granddaddy of all gundams, I didn’t want to change this kit too much in appearance, but I didn’t want it to look like plain old plastic either. I decided to just paint the internal frame, do some detailing, decals, and then weather the armour a bit. Here is the finished product, complete with LED mod for the eyes:


(..someday i'll get around to hiding those wires >_< )
 
I only spent about a day redoing this model, and it goes to show how a little effort goes a long way. I’m glad the previous owner was able to keep it in such good shape after so many years (I believe this model was released back in 2000). I can only hope my bootlegs look this good after 12 years!